A PaaS of Our Own: Dokku
I have ideas all the time for small web applications. I suspect you do as well. These are the little tools - stuff for me and/or my friends. These applications will never make me any money, so I’m always put off a little on where to host them online. Heroku and similar PaaS (Platform as a Service) providers will just be too expensive to run a bunch of little applications - especially with database and file hosting. Enter Dokku, a self-hosted PaaS.
In this tutorial, we are going to set up Dokku, and deploy a static HTML page to it as a test. Dokku has good documentation doing a manual installation, but to make it even easier, we are going to use DigitalOcean’s one-click install to get everything up and running.
If you don’t already have a DigitalOcean account, you can sign up here with my affiliate link.
SSH Keys
Deploying to Dokku is done via git, and you will need to have SSH keys created. If you do not already have SSH keys created, GitHub has great documentation on creating new keys.
Load SSH Keys into DigitalOcean
First we need to add our public SSH key to DigitalOcean. This key will be loaded into our Dokku server so we can SSH into the server once it has been created.
- Log into your DigitalOcean account.
- Go to the security settings for your account.
- Scroll down to SSH Keys and click the “Add SSH Key” button.
- Copy the contents of your public SSH key into the form and give your key a name (if unsure, use the name of your computer so you know what computer the key is from).
- if you are on macOS (and your public key is
id_rsa.pub) you can use the commandcat ~/.ssh/id_rsa.pub | pbcopyto copy your SSH key contents and then paste them into the form.
- if you are on macOS (and your public key is
- Click “Add SSH Key”.
Once our key has been added we can create the new Dokku server.
Adding a Domain Name
Also before creating the Dokku server, you will need a domain name for the server. Using a domain name will enable us to deploy future applications to subdomains.
To connect your domain name to Dokku, you need to configure your domain to use DigitalOcean’s nameservers. The process for this will depend on registrar and you will need to check your registrar’s support information on how to set the nameservers.
For reference, DigitalOcean’s nameservers are:
- ns1.digitalocean.com
- ns2.digitalocean.com
- ns3.digitalocean.com
dev88.xyz
For this tutorial, we will be using the domain name dev88.xyz. Make sure to change any commands or settings in this tutorial from dev88.xyz to your own domain name.
DNS Propagation
If you have just changed the nameservers for your domain name, it can take several hours for that change to be seen by your computer (and other computers).
- To see if your changes have propagated, check DNSLookup.org - enter your domain name, select “NS” from the option and then click “Lookup”. If you see DigitalOcean’s nameservers listed, then propagation has mostly finished.
- You may still need to clear the local DNS cache on your computer. You can search how to how to flush your DNS cache for your operating system.
“One-Click” Dokku
To set up the new Dokku server go to the new droplet page and use the following settings:
- “Choose an image”: click the “One-click apps tab” and select “Dokku 0.12.13 on 18.04” (you can also use this link to go straight to that option).
- “Choose a Size”: select the $10/month (1 CPU/2 GB RAM) option under “Standard Droplets”. This is the minimum necessary for Dokku and a good starting size for experimentation. You may have to scale your server up in the future, but we can start small.
- “Add backups”: If you will be using your Dokku server for anything long-term and you can afford it, I highly recommend you select Yes.
- “Add block storage”: We do not need the added expense of block storage. Do not add any.
- “Choose a datacenter region”: Select a datacenter close to you.
- “Select additional options”: Leave these unchecked.
- “Add your SSH keys”: click the checkbox next to the SSH key you added earlier.
- “Finalize and create”
- “How many Droplets?”: Leave this at 1.
- “Choose a hostname”: Change this to “Dokku” or another hostname that you will recognize.
- “Select project”: Leave the default project.
Finally, click the “Create” button and wait for the droplet to be created.
Server Updates
Dokku is installed by adding PackageCloud as an apt source. This means that apt-get update && apt-get upgrade will update Dokku (whenever PackageCloud has been updated, which is pretty often).
You should be doing package updates on your server on a regular basis to get bug fixes and security updates. If you want to be extra careful, you can create a snapshop of your server before running the update. After you have completed the update and confirmed everything works then you can delete the snapshot.
Dokku Configuration
Once the droplet is created, copy the IP address and go to it with your browser.
Bad Gateway
If you go to the IP address and get a 502 Bad Gateway error, wait ~5 minutes or so for the server to finish initializing.
You should see a configuration form like this:
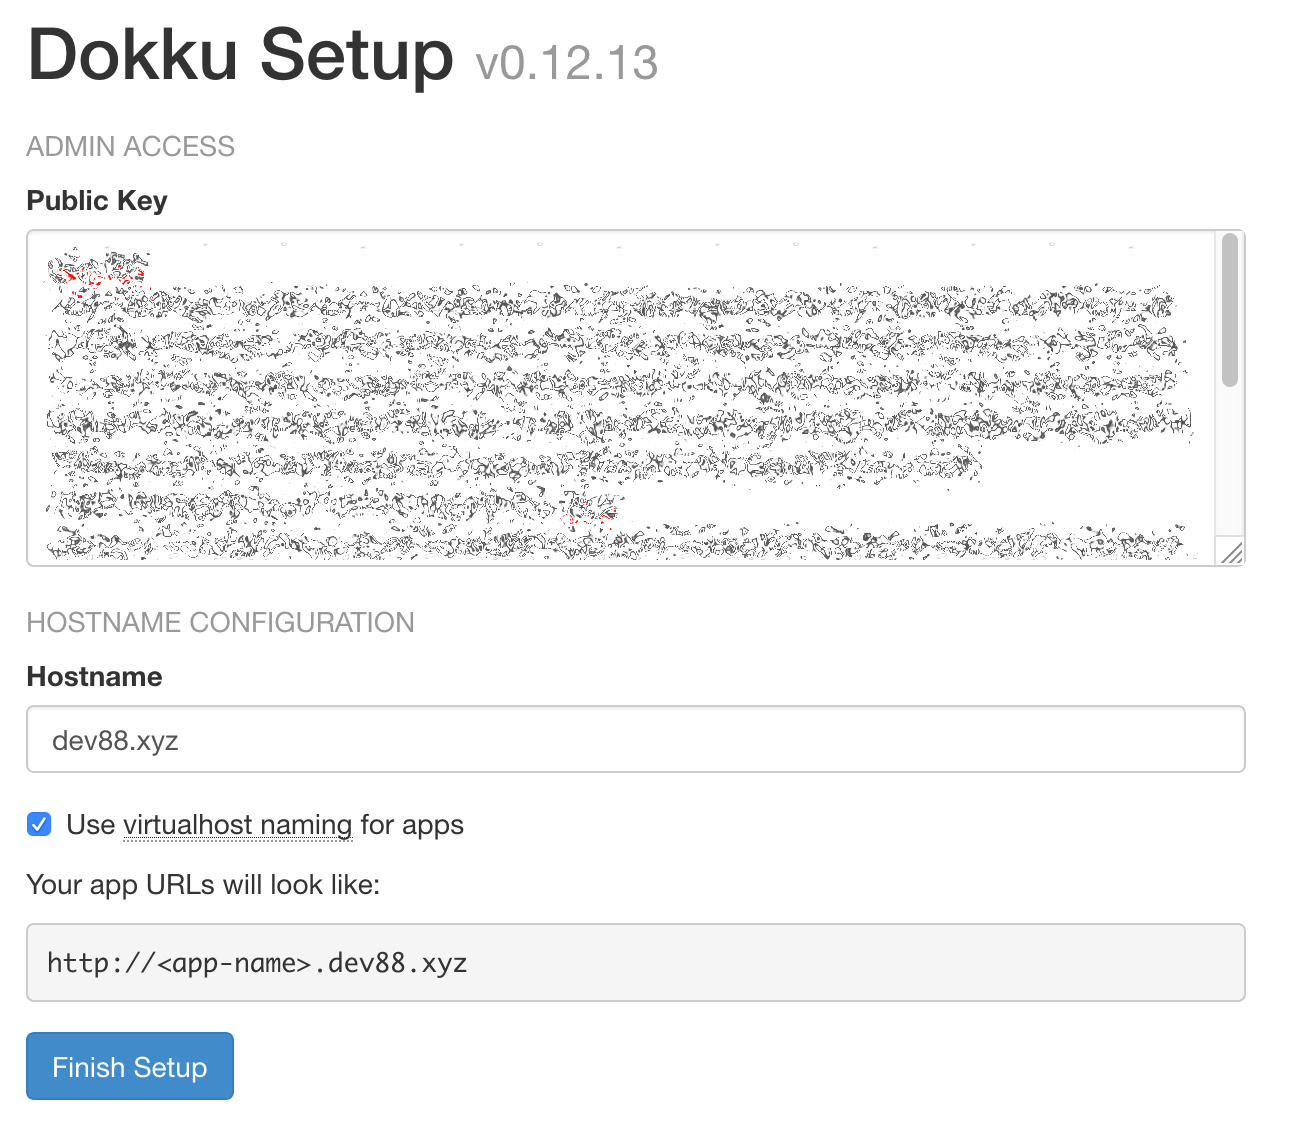
- “Public Key”: Your SSH key should be pre-filled into the SSH Key textarea, but if not, copy the contents of your public SSH key into the form field.
- “Hostname”: Enter your domain name (mine is
dev88.xyz) - “Use virtualhost naming for apps”: Check this box.
Click “Finish Setup” and once Dokku finishes its configuration, you will be taken to the Dokku documentation for Deploying to Dokku.
Before we deploy anything to Dokku, we need to do a few things.
Connecting Our Domain Name
Back in your DigitalOcean dashboard, go to Networking. Under “Add a domain” enter your domain name, change the project (if necessary), and then click “Add domain”.
You will be taken to the configuration for your domain name. We now need to add two DNS records for the domain name. Both records will be “A” records.
- For the root domain name:
- “Hostname”:
@ - “Will Direct To”: Select your dokku server
- “TTL”: Leave the default
- Click “Create Record”
- “Hostname”:
- Next we need a record for our subdomains:
- “Hostname”:
* - “Will Direct To”: Select your dokku server
- “TTL”: Leave the default
- Click “Create Record”
- “Hostname”:
Once we have created the DNS records we need to deploy a new application to Dokku.
Deploying to Dokku
Dokku’s documentation uses a Ruby on Rails app for their tutorial, but that is more complex than we need. We are just going to deploy a single HTML webpage.
Create a new Application
Before we can do anything we need to create a new application in Dokku.
- SSH into your Dokku server:
ssh [email protected]; - Create a
homeapp with the following command:dokku apps:create home - Disconnect from the Dokku server using the
exitcommand.
Create the Web Page
Create a new directory on your drive and create an index.html file with following contents:
<!DOCTYPE html>
<html>
<head>
    <title>Hello, Dokku</title>
</head>
<body>
    <h1>Hello, Dokku
</body>
</html>
Give Dokku a Hint
To let Dokku know that our application is a static site, we need to add .static file. Dokku will see this file and know how to automatically configure the application for hosting. In the same directory as your index.html file run the following command:
touch .static
Setup Git
Now we need to setup git for our application. Run the following commands in the same directory as our index.html file:
git initto initialize the repository.git remote add dokku [email protected]:homewill add our Dokku server as a git remote so we can deploy to it. Make sure to use your domain name instead of dev88.xyz.git add . && git commit -m 'Initial commit'will add our files to the git repository.git push dokku masterwill push our application to Dokku.
Once we push our code to Dokku, we will see our application get configured and deployed. Once the push completes you should see:
=====> Application deployed:
       http://home.dev88.xyz

To dev88.xyz:home
 * [new branch]      master -> master
You should now be able to browse to the URL under “Application deployed:” (http://home.dev88.xyz in the example above).
You should also be able to your root URL (http://dev88.xyz) and see the same page. Dokku maps the first application that is created to the root address (without a subdomain).
Adding SSL via Let’s Encrypt
Dokku provides a Let’s Encrypt plugin to easily add SSL to our applications. SSH into your server (ssh [email protected]) and we can use the plugin to secure our application:
dokku plugin:install https://github.com/dokku/dokku-letsencrypt.gitto install the plugin.dokku config:set --global [email protected]to configure email address to use for Let’s Encrypt.dokku letsencrypt hometo add a certificate to ourhomeapp.
Once the certificate is issued, you should now be able to go to https://home.dev88.xyz and have a valid SSL certificate. If you go to the non-HTTPS version of the page (http://home.dev88.xyz) you should get forwarded to the HTTPS page. If we check https://dev88.xyz though we get an SSL error.
A Broken Root
The reason for the SSL error is that our certificate is only valid for home.dev88.xyz. We need to add dev88.xyz to the certificate. Run these commands on the server:
dokku domains:add home dev88.xyzwill tell Dokku to add thedev88.xyzto thehomeapplication. Make sure to use your domain name instead of dev88.xyz.dokku letsencrypt homewill get a new certificate with updated domains.
Once the new certificate is issued, you should now be able to go to https://dev88.xyz and no longer have an error.
Updating the SSL certificate
Let’s Encrypt SSL certificates need to be updated on a regular basis. The developers of the Dokku plugin make this easy with the following command (run on the Dokku server):
dokku letsencrypt:cron-job --add
This command will add a cron job to automatically update our certificates.
SUCCESS!
We now have a Dokku server up and running that we can add new applications to. Experiment with your new server! Build awesome stuff!
What Next?
Coming soon will be a series on deploying Symfony applications on Dokku. I am also hosting this blog on a Dokku server using Hugo and I may do another series in the future documenting how I set that up as well.